Rails: Rodauthによるゼロからの認証システム構築チュートリアル(翻訳)
本チュートリアルでは、Rodauth認証フレームワークを用いて、Railsアプリに完全な機能を備えた認証機能とアカウント管理機能を追加する方法を紹介します。 RodauthはDevise、Sorcery、Clearance、Authlogicなどの主流の認証ライブラリと比べて多くのメリットがあります。詳しくは過去記事をご覧ください。

本チュートリアルでは、Rodauth認証フレームワークを使って、Railsアプリに完全な機能を備えた認証とアカウント管理を追加する方法を紹介します。 Rodauthは、Devise、Sorcery、Clearance、Authlogicなどのメジャーな他のライブラリに比べて多くのメリットがあります。詳しくは過去記事をご覧ください。
本チュートリアルでは、PostgresSQL、Hotwire、Bootstrapを利用する新しいRailsアプリで作業します。このアプリには、ホームページ、ナビゲーションバー、flashメッセージ、および投稿のscaffold設定が含まれています。
$ rails new blog --database=postgresql --css=bootstrap
$ cd blog
$ rails db:create
$ rails generate controller home index
$ rails generate scaffold post title:string body:text
$ rails db:migrate
# config/routes.rb
Rails.application.routes.draw do
  root to: "home#index"
  resources :posts
end
<!-- app/views/layouts/application.html.erb -->
<!-- ... -->
  <body>
    <%= render "navbar" %>

    <div class="container">
      <%= render "flash" %>
      <%= yield %>
    </div>
  </body>
<!-- ... -->
<!-- app/views/application/_flash.html.erb -->
<% if notice %>
  <div class="alert alert-success"><%= notice %></div>
<% end %>
<% if alert %>
  <div class="alert alert-danger"><%= alert %></div>
<% end %>
<!-- app/views/application/_navbar.html.erb -->
<nav class="navbar navbar-expand-sm navbar-light bg-light border-bottom mb-4">
  <div class="container">
    <%= link_to "Rails App", root_path, class: "navbar-brand" %>

    <div class="navbar-collapse">
      <ul class="navbar-nav">
        <li class="nav-item">
          <%= link_to "Posts", posts_path, class: "nav-link #{"active" if request.path.start_with?("/posts")}" %>
        </li>
      </ul>
    </div>
  </div>
</nav>
🔗 Rodauthをインストールする
以下を実行してrodauth-rails gemをGemfileに追加します。
$ bundle add rodauth-rails

次に、rodauth-railsが提供するrodauth:installジェネレータを実行します。
$ rails generate rodauth:install

# create  db/migrate/20200820215819_create_rodauth.rb
# create  config/initializers/rodauth.rb
# create  config/initializers/sequel.rb
# create  app/misc/rodauth_app.rb
# create  app/misc/rodauth_main.rb
# create  app/controllers/rodauth_controller.rb
# create  app/models/account.rb
# create  app/mailers/rodauth_mailer.rb
これにより、RodauthアプリとRodauthのデフォルト設定が作成され、Rodauthがデータベースとのやりとりに使うSequelがActive Recordのデータベース接続を再利用する形で構成され(sequel-activerecord_connection gemを利用)、読み込んだRodauth機能のテーブルを作成するマイグレーションが生成されます。

次はマイグレーションを実行しましょう。
$ rails db:migrate

# == CreateRodauth: migrating ==========================
# -- create_table(:accounts)
# -- create_table(:account_password_hashes)
# -- create_table(:account_password_reset_keys)
# -- create_table(:account_verification_keys)
# -- create_table(:account_login_change_keys)
# -- create_table(:account_remember_keys)
# == CreateRodauth: migrated ===========================
RodauthMailerでメールのリンクを生成可能にするには、Action MailerのデフォルトURLオプションを以下のように設定する必要があります。
# config/environments/development.rb
Rails.application.configure do
  # ...
  config.action_mailer.default_url_options = { host: 'localhost', port: 3000 }
end
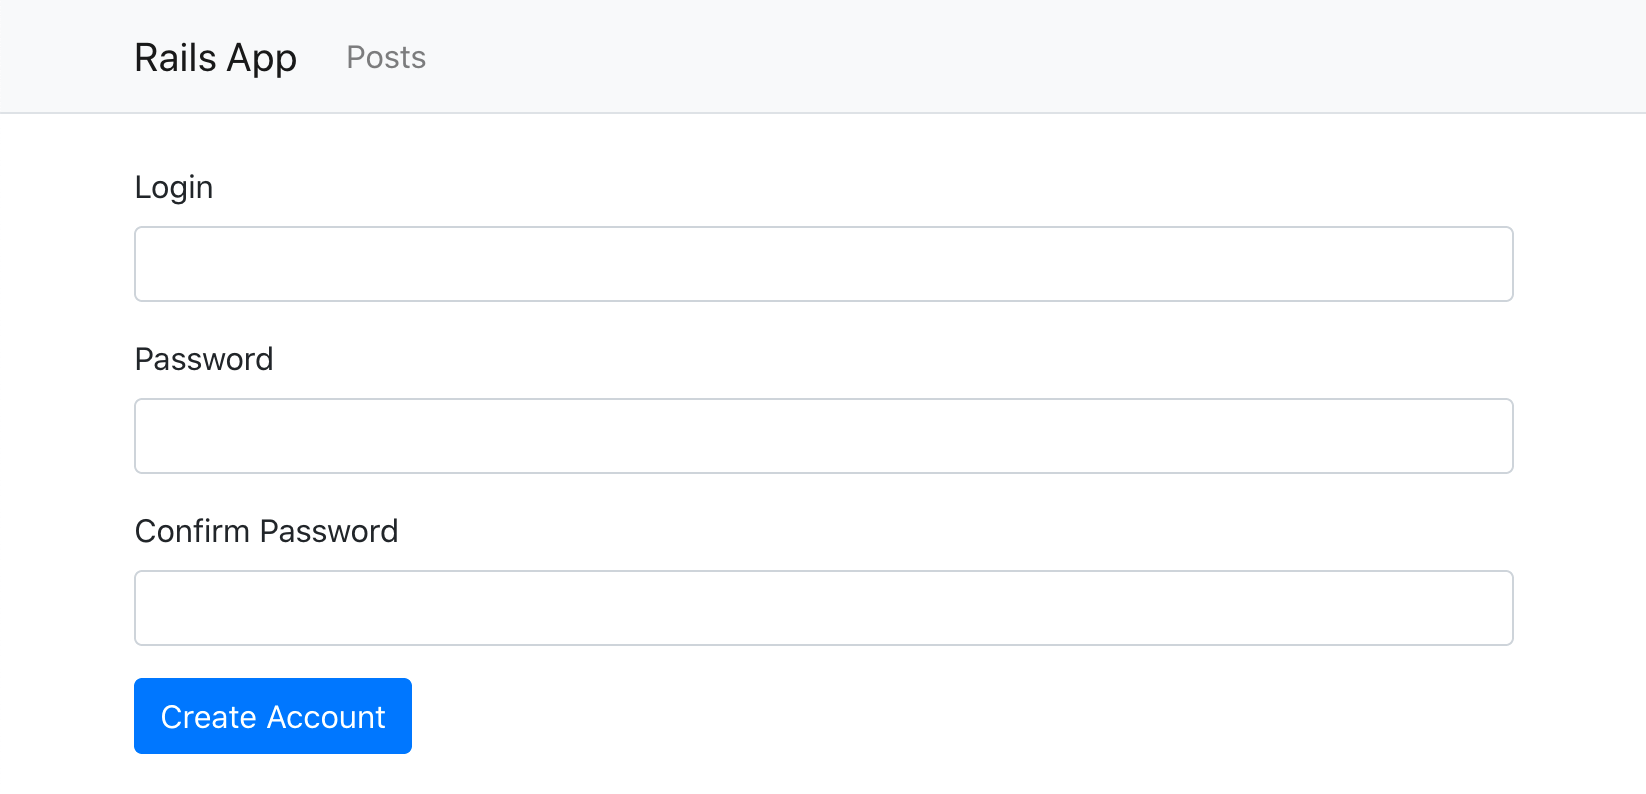
Railsサーバーを再起動すると、/create-accountページにアクセス可能になり、以下のようにRodauthのデフォルトの登録フォームが表示されるはずです。
🔗 認証リンクを追加する
rodauth-rails gemによって生成されたRodauth設定は、認証およびアカウント管理用のルーティングを提供します。
$ rails rodauth:routes

# /login                   rodauth.login_path
# /create-account          rodauth.create_account_path
# /verify-account-resend   rodauth.verify_account_resend_path
# /verify-account          rodauth.verify_account_path
# /logout                  rodauth.logout_path
# /remember                rodauth.remember_path
# /reset-password-request  rodauth.reset_password_request_path
# /reset-password          rodauth.reset_password_path
# /change-password         rodauth.change_password_path
# /change-login            rodauth.change_login_path
# /verify-login-change     rodauth.verify_login_change_path
# /close-account           rodauth.close_account_path
訳注
Rodauthのルーティングはrails routesコマンドでは表示されません。rails rodauth:routesが必要です。
このルーティング情報を利用して、ナビゲーションバーにメインの認証リンクをいくつか追加しましょう。
<!-- app/views/application/_navbar.html.erb -->
<!-- ... --->
<% if rodauth.logged_in? %>
  <div class="dropdown">
    <button class="btn btn-info dropdown-toggle" data-bs-toggle="dropdown" type="button">
      <%= current_account.email %>
    </button>
    <div class="dropdown-menu dropdown-menu-end">
      <%= link_to "Change password", rodauth.change_password_path, class: "dropdown-item" %>
      <%= link_to "Change email", rodauth.change_login_path, class: "dropdown-item" %>
      <div class="dropdown-divider"></div>
      <%= link_to "Close account", rodauth.close_account_path, class: "dropdown-item text-danger" %>
      <%= link_to "Sign out", rodauth.logout_path, data: { turbo_method: :post }, class: "dropdown-item" %>
    </div>
  </div>
<% else %>
  <div>
    <%= link_to "Sign in", rodauth.login_path, class: "btn btn-outline-primary" %>
    <%= link_to "Sign up", rodauth.create_account_path, class: "btn btn-success" %>
  </div>
<% end %>
<!-- ... --->
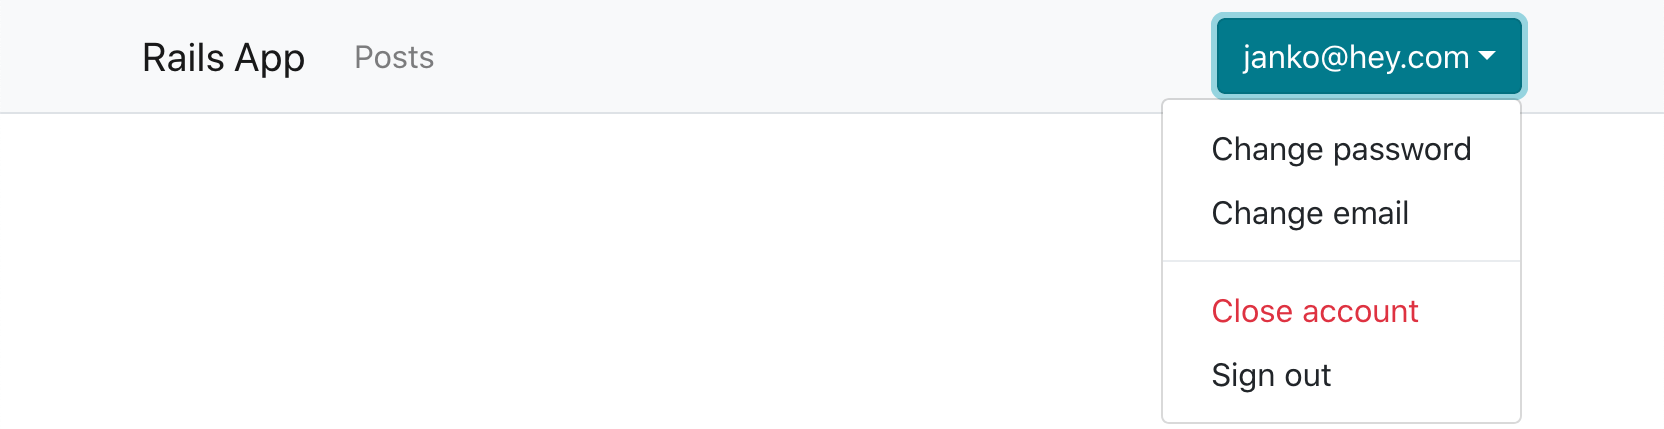
ここでは、rodauth-rails gemが提供する#current_accountヘルパーメソッドを使っています。これは現在サインイン中のアカウントを返します。
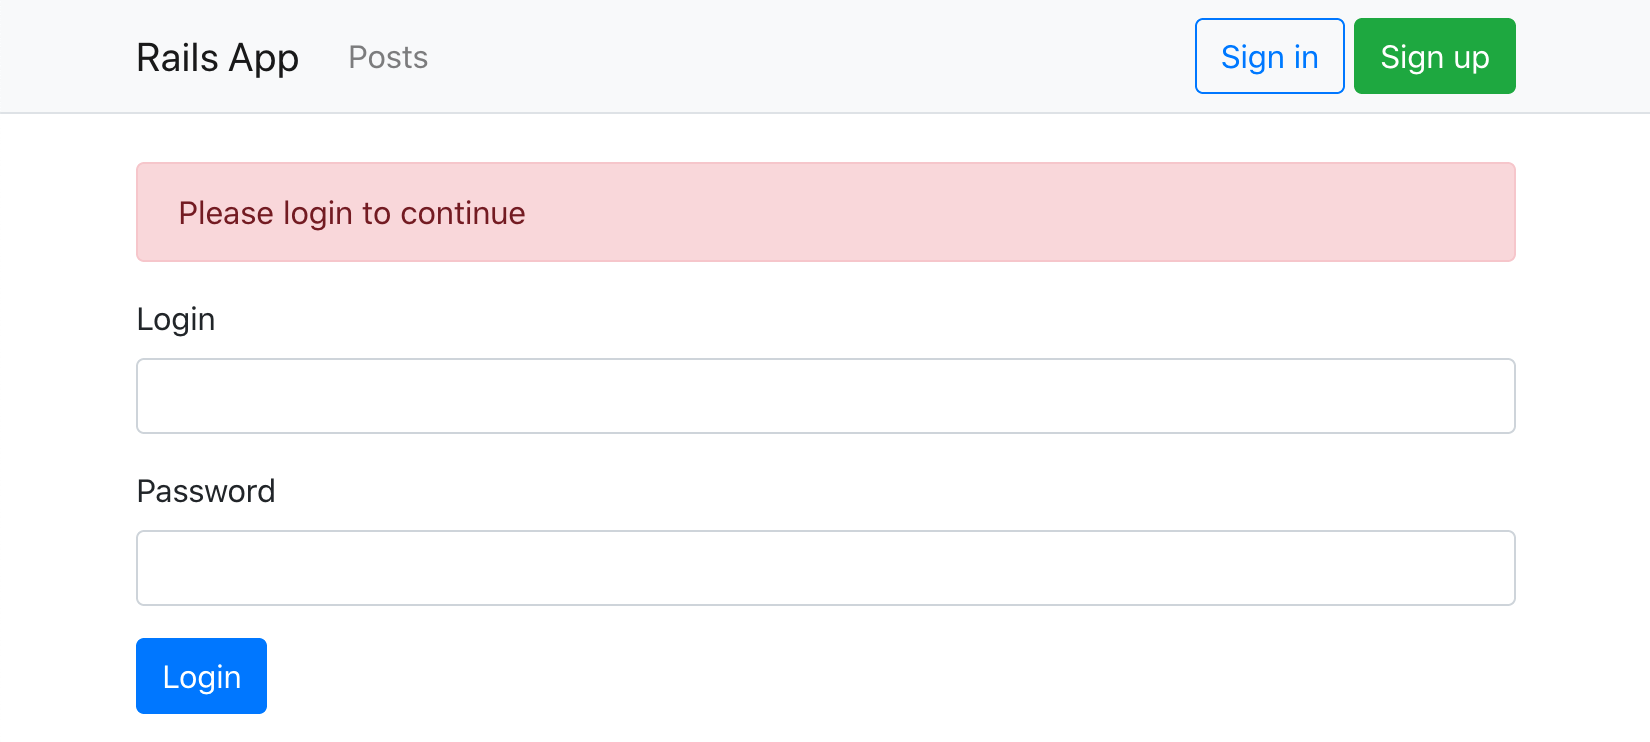
これで、ユーザーがログインしていない場合にログイン用リンクとユーザー登録用のリンクが以下のように表示されます。

ログイン済みのユーザーには、基本的なアカウント管理用のリンクが表示されます。
🔗 認証を必須にする
既に認証が動くようになったので、アプリケーションの特定の部分でユーザー認証を必須にしたくなるでしょう。ここでは、PostsControllerで認証を必須にしたいとします。
コントローラーにbefore_actionコールバックを追加する形で認証することも可能ですが、RodauthならRodauthアプリのルーティングブロック内にも認証を記述できます。この方法では、認証がRailsのルーティングの前に呼び出されるため、認証ロジックを1つの場所に凝縮させることが可能です。
# app/misc/rodauth_app.rb
class RodauthApp < Rodauth::Rails::App
  # ...
  route do |r|
    # ...
    if r.path.start_with?("/posts")
      rodauth.require_authentication
    end
  end
end
これで、ブラウザで/postsページを開くと、ログインしていないユーザーは/loginページにリダイレクトされるようになります。
以下のように、postsをaccountsテーブルに関連付けることも可能です。
$ rails generate migration add_account_id_to_posts account:references
$ rails db:migrate
# app/models/account.rb
class Account < ApplicationRecord
  # ...
  has_many :posts
end
続いて、PostsControllerで現在のアカウントのみを対象とするためにcurrent_accountでスコープを絞ります。
# app/controllers/posts_controller.rb
class PostsController < ApplicationController
  # ...
  def index
    @posts = current_account.posts.all
  end
  # ...
  def create
    @post = current_account.posts.build(post_params)
    # ...
  end
  # ...
  private
    def set_post
      @post = current_account.posts.find(params[:id])
    end
    # ...
end
🔗 フィールドを追加する
電子メールアドレス以外の情報もユーザーに表示できるよう、登録時にユーザー名の入力を必須にしてみましょう。これは、Rodauthの設定方法を確認する機会でもあります。
登録フォームを少し編集する必要があるので、最初にRodauthのHTMLテンプレートをRailsアプリケーションにコピーしておきましょう。
$ rails generate rodauth:views

# create  app/views/rodauth/_login_form.html.erb
# create  app/views/rodauth/_login_form_footer.html.erb
# create  app/views/rodauth/_login_form_header.html.erb
# create  app/views/rodauth/login.html.erb
# create  app/views/rodauth/multi_phase_login.html.erb
# create  app/views/rodauth/logout.html.erb
# create  app/views/rodauth/create_account.html.erb
# create  app/views/rodauth/verify_account_resend.html.erb
# create  app/views/rodauth/verify_account.html.erb
# create  app/views/rodauth/reset_password_request.html.erb
# create  app/views/rodauth/reset_password.html.erb
# create  app/views/rodauth/change_password.html.erb
# create  app/views/rodauth/change_login.html.erb
# create  app/views/rodauth/close_account.html.erb
生成されたcreate_account.erbテンプレートを開いて、nameフィールドを新たに追加します。
<!-- app/views/rodauth/create_account.erb -->
<%= form_with url: rodauth.create_account_path, method: :post, data: { turbo: false } do |form| %>
  <!-- new "name" field -->
  <div class="mb-3">
    <%= form.label :name, "Name", class: "form-label" %>
    <%= form.text_field :name, value: params[:name], required: true, class: "form-control #{"is-invalid" if rodauth.field_error("name")}", aria: ({ invalid: true, describedby: "login_error_message" } if rodauth.field_error("name")) %>
    <%= content_tag(:span, rodauth.field_error("name"), class: "invalid-feedback", id: "login_error_message") if rodauth.field_error("name") %>
  </div>
  <!-- ... -->
<% end %>
このユーザー名は認証では使う予定がないので、新たなprofilesテーブルに保存して、accountsテーブルと関連付けることにしましょう。
$ rails generate model Profile account:references name:string
$ rails db:migrate
# app/models/account.rb
class Account < ApplicationRecord
  # ...
  has_one :profile
end
次は、このRodauthアプリで新しいnameパラメータを実際に処理できるようにする必要があります。nameフィールドに入力されていることをバリデーションしてからアカウントを作成し、関連するプロファイルも作成します。
# app/misc/rodauth_main.rb
class RodauthMain < Rodauth::Rails::Auth
  configure do
    # ...
    before_create_account do
      # nameフィールドの存在をバリデーションする
      throw_error_status(422, "name", "must be present") unless param_or_nil("name")
    end
    after_create_account do
      # 関連付けられるprofileレコードを作成してnameを設定する
      Profile.create!(account_id: account_id, name: param("name"))
    end
    after_close_account do
      # 関連付けられるprofileレコードを削除する
      Profile.find_by!(account_id: account_id).destroy
    end
    # ...
  end
end
これで、ナビゲーションバーを更新してメールアドレスをユーザー名に変更できるようになります。
  <button class="btn btn-info dropdown-toggle" data-bs-toggle="dropdown" type="button">
-   <%= current_account.email %>
+   <%= current_account.profile.name %>
  </button>

🔗 最後に
本チュートリアルでは、Rodauth認証フレームワークを利用して、以下の機能をサポートする完全な認証フローとアカウント管理フローを段階的に構築しました。
- ログイン/ログアウト
- アカウント作成(メールによるユーザー確認と猶予期間付き)
- パスワード変更
- パスワードリセット
- メールアドレス変更(メールによるユーザー確認付き)
- アカウント削除
その他に、認証リンクの追加方法や特定のルートでの認証要件の追加方法、登録フォームへの新しいフィールドの追加方法についても学びました。
私は個人的に、Rodauthの素晴らしさに非常に興奮しています。印象的な機能が揃っていて、設計もすっきりしており、しかもRailsに縛られていないという点も魅力的です。私は、Railsでのスタートアップを可能な限り手軽にするための支援を提供すべく、今も全力でrodauth-railsに取り組んでいるので、RodauthがRailsコミュニティでさらに多くの注目を集めることを願っています。
関連記事
https://techracho.bpsinc.jp/hachi8833/2023_07_20/123585
概要
原著者の許諾を得て翻訳・公開いたします。
日本語タイトルは内容に即したものにしました。
なお、Rodauth-RailsはRails 7.1でも問題なく利用できました。
以下の記事もどうぞ。
https://techracho.bpsinc.jp/hachi8833/2023_07_20/123585