概要
概要
原著者の許諾を得て翻訳・公開いたします。
- 英語記事: The Ultimate Intermediate Ruby on Rails Tutorial: Let’s Create an Entire App!
- 原文公開日: 2017/12/17
- 著者: Domantas G
Rails5中級チュートリアルはセットアップが短めで、RDBMSにはPostgreSQL、テストにはRSpecを用います。
原文が非常に長いので分割します。章ごとのリンクは順次追加します。
注意: Rails中級チュートリアルは、Ruby on Railsチュートリアル(https://railstutorial.jp/)(Railsチュートリアル)とは著者も対象読者も異なります。
目次
- 1. 序章とセットアップ
- 2. レイアウト
- 3. 投稿
- 3-1 認証
- 3-2 ヘルパー
- 3-3 テスト
- 3-4 メインフィード(本セクション)
- 3-5 単一の投稿
- 3-6 特定のブランチ
- 3-7 Service Object
- 3-8 新しい投稿を作成する
- 4. インスタントメッセージ
- 4-1 非公開チャット
- 4-2 連絡先
- 4-3 グループチャット
- 4-4 メッセンジャー
- 5. 通知
- 5-1 つながりリクエスト
- 5-2 チャット
Rails5「中級」チュートリアル(3-4)投稿機能: メインフィード(翻訳)
homeページで投稿のフィードを作成することにします。このフィードには、すべての種類の投稿をカード形式で表示することにしましょう。
まずは新しいブランチを切ります。
git checkout -b main_feed
Postというモデルを生成します。
rails g model post
投稿を分類するためのCategoryモデルも必要になります。
rails g model category
それではUserモデル、Categoryモデル、Postモデル同士の関連付けを作成しましょう。
1件の投稿ごとにカテゴリを1つとその作者(ユーザー)を1人関連付けることにします。モデルのファイルを開いて以下のように関連付けを追加します。
class Post < ApplicationRecord
  belongs_to :user
  belongs_to :category
end

class User < ApplicationRecord
  ...
  has_many :posts, dependent: :destroy
end

class Category < ApplicationRecord
  has_many :posts
end
引数のdependent: :destroyは、ユーザーを1人削除したときに、そのユーザーが作成したすべての投稿も削除するということを指示します。
続いてマイグレーションファイルでデータのカラムと関連付けを定義しなければなりません(Gist、Gist)。
# db/migrate/CREATION_DATE_create_posts.rb
class CreatePosts < ActiveRecord::Migration[5.1]
  def change
    create_table :posts do |t|
      t.string :title
      t.text :content
      t.belongs_to :category, index: true
      t.belongs_to :user, index: true
      t.timestamps
    end
  end
end
# db/migrate/CREATION_DATE_create_categories.rb
class CreateCategories < ActiveRecord::Migration[5.1]
  def change
    create_table :categories do |t|
      t.string :name
      t.string :branch
    end
  end
end
マイグレーションを実行します。
rails db:migrate
変更をcommitします。
git add -A
git commit -m "
- Generate Post and Category models.
- Create associations between User, Post and Category models.
- Create categories and posts database tables."
spec
新しく作成したモデルをテストできる状態になりました。テスト用のサンプルデータは後で必要になります。1件の投稿は1つのカテゴリに属するので、関連付けを設定するためのサンプルカテゴリのデータも必要になります。
factoriesディレクトリでcategoryファクトリを作成します(Gist)。
訳注: 原文の
FactoryGirlはFactoryBotに置き換えました。以下同文です。
# spec/factories/categories.rb
FactoryBot.define do
  factory :category do
    sequence(:name) { |n| "name#{n}" }
    sequence(:branch) { |n| "branch#{n}" }
  end
end
factoryディレクトリにpostファクトリーを作成します(Gist)。
# spec/factories/posts.rb
FactoryBot.define do
  factory :post do
    title 'a' * 20
    content 'a' * 20
    user
    category
  end
end
ファクトリーで関連付けを設定するのはご覧のとおり非常に簡単です。postファクトリーの中にファクトリーの名前を書くだけで、userとcategoryの関連付けをpostファクトリー用に設定できます。
変更をcommitします。
git add -A
git commit -m "Add post and category factories"
現時点ではモデルのコードしか書いていないので、テストは関連付けについてのみ行います。
post_spec.rbをエディタで開きます。
spec/models/post_spec.rb
関連付けをテストするspecを追加します。追加後は以下のようになります(Gist)。
# spec/models/post_spec.rb
require 'rails_helper'

RSpec.describe Post, type: :model do
  context 'Associations' do
    it 'belongs_to user' do
      association = described_class.reflect_on_association(:user).macro
      expect(association).to eq :belongs_to
    end

    it 'belongs_to category' do
      association = described_class.reflect_on_association(:category).macro
      expect(association).to eq :belongs_to
    end
  end
end
このコードでは、現在のコンテキストのクラスを取得するのに[described_class](https://relishapp.com/rspec/rspec-core/docs/metadata/described-class)メソッドを使っています。これはPostのときに書いたテストと基本的に同じです。続いて[reflect_on_association](https://apidock.com/rails/v2.3.2/ActiveRecord/Reflection/ClassMethods/reflect_on_association)メソッドを用いて、正しい関連付けが返されるかどうかをチェックしています。
他のモデルについても同様のテストを書きます(Gist、Gist)。
# spec/models/category_spec.rb
require 'rails_helper'

RSpec.describe Category, type: :model do
  context 'Associations' do
    it 'has_many posts' do
      association = described_class.reflect_on_association(:posts)
      expect(association.macro).to eq :has_many
    end
  end
end
# spec/models/user_spec.rb
require 'rails_helper'

RSpec.describe User, type: :model do
  context 'Associations' do
    it 'has_many posts' do
      association = described_class.reflect_on_association(:posts)
      expect(association.macro).to eq :has_many
      expect(association.options[:dependent]).to eq :destroy
    end
  end
end
変更をcommitします。
git add -A
git commit -m "Add specs for User, Category, Post models' associations"
homeページのレイアウト
現時点のhomeページはダミーの"Home page"しかない空っぽの状態です。ここらでBootstrapを用いたレイアウトの作成に取りかかりましょう。homeページのビューファイルviews/pages/index.html.erbを開き、ファイルの中身を以下のコードで置き換えてページのレイアウトを作成します(Gist)。
<!-- views/pages/index.html.erb -->
<div class="container">
  <div class="row">
    <div id="side-menu"  class="col-sm-3">
    </div><!-- side-menu -->

    <div id="main-content" class="col-sm-9">
    </div><!-- main-content -->

  </div><!-- row -->
</div><!-- container -->
CSSをいくつか追加して、要素のスタイルとレスポンシブな動作を定義しましょう。
stylesheets/partialsディレクトリでhome_page.scssファイルを作成します。
assets/stylesheets/partials/home_page.scss
以下のコードをCSSファイルに追加します(Gist)。
//assets/stylesheets/partials/home_page.scss
#main-content {
  background: white;
  min-height: 800px;
  margin: 0;
  padding: 10px 0 0 0;
}

#side-menu {
  padding: 0;
  #links-list {
    margin-top: 20px;
    padding: 0;
    font-size: 14px;
    font-size: 1.4rem;
    a {
      display: block;
      padding: 5px 15px;
      margin: 2px 0;
    }
    li {
      min-width: 195px;
      max-width: 195px;
    }
    li, li a {
      color: black;
      text-decoration: none;
    }
    li:hover {
      border-radius: 50px;
      background: $navbarColor;
    }
    li:hover a, li:hover i {
      color: white;
    }
  }
}
mobile.scssファイルにmax-width: 767pxメディアクエリを追加します(Gist)。
// assets/stylesheets/responsive/mobile.scss
  #side-menu {
    display: none !important;
  }
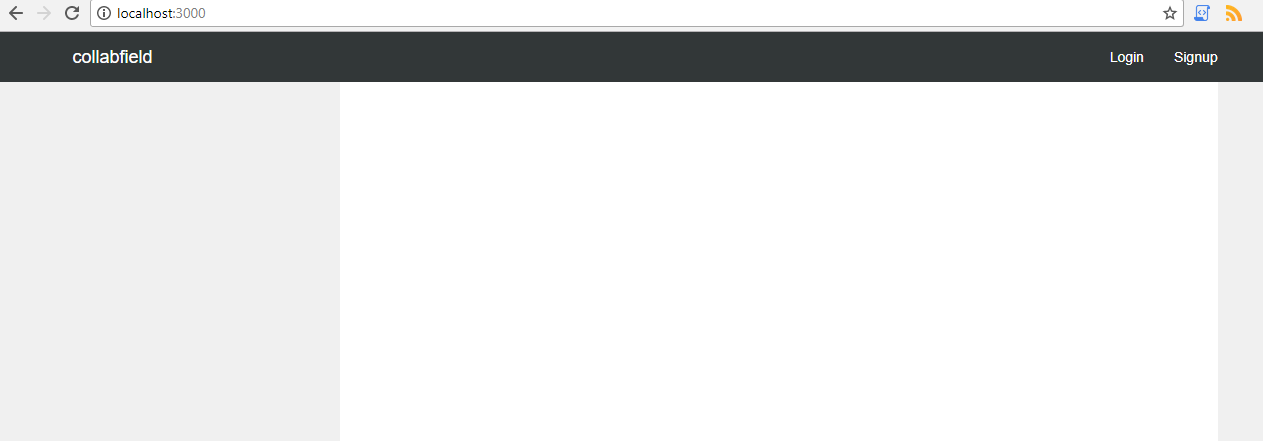
これで、画面が大きいときのhomeページは以下のようになるはずです。
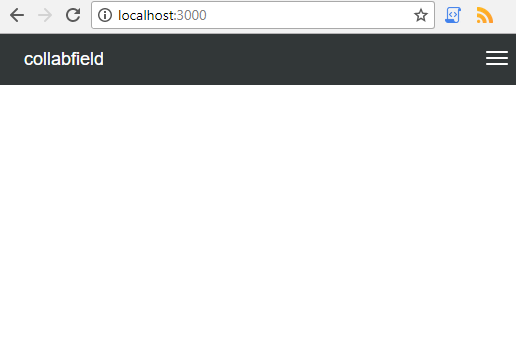
画面が小さいときは以下のようになります。
変更をcommitします。
git add -A
git commit -m "
- Add the bootstrap layout to the home page
- Add CSS to make home page layout's stylistic and responsive design changes"
Seeds
homeページに投稿を表示するには、データベースに何か入れておく必要があります。データを手作りするのは退屈かつ時間がかかるので、seedを使って自動化します。seeds.rbファイルを開きます。
db/seeds.rb
以下のコードを追加します(Gist)。
# db/seeds.rb
def seed_users
  user_id = 0
  10.times do
    User.create(
      name: "test#{user_id}",
      email: "test#{user_id}@test.com",
      password: '123456',
      password_confirmation: '123456'
    )
    user_id = user_id + 1
  end
end


def seed_categories
  hobby = ['Arts', 'Crafts', 'Sports', 'Sciences', 'Collecting', 'Reading', 'Other']
  study = ['Arts and Humanities', 'Physical Science and Engineering', 'Math and Logic',
          'Computer Science', 'Data Science', 'Economics and Finance', 'Business',
          'Social Sciences', 'Language', 'Other']
  team = ['Study', 'Development', 'Arts and Hobby', 'Other']

  hobby.each do |name|
    Category.create(branch: 'hobby', name: name)
  end

  study.each do |name|
    Category.create(branch: 'study', name: name)
  end

  team.each do |name|
    Category.create(branch: 'team', name: name)
  end
end

def seed_posts
  categories = Category.all

  categories.each do |category|
    5.times do
      Post.create(
        title: Faker::Lorem.sentences[0],
        content: Faker::Lorem.sentences[0],
        user_id: rand(1..9),
        category_id: category.id
      )
    end
  end
end

seed_users
seed_categories
seed_posts
コードからわかるように、seed_usersメソッドでUserレコードを、seed_categoriesでCategoryレコードを、seed_postsでPostのレコードをそれぞれdevelopmentデータベース内に作成しています。faker gemも使ってダミーテキストを生成しているので、Gemfileにfaker gemを追加しましょう。
gem 'faker'
続いて以下を実行します。
bundle install
seeds.rbを使ってデータをseedするには、以下を実行します。
rails db:seed
変更をcommitします。
git add -A
git commit -m "
- Add faker gem
- Inside the seeds.rb file create methods to generate
  User, Category and Post records inside the development database"
投稿のレンダリング
投稿を表示するには、ビューにpostsディレクトリが必要です。
Postsというコントローラを生成すると、自動的にpostsディレクトリがビューに作成されます。
rails g controller posts
このアプリではPagesControllerがhomeページを担当するので、pages_controller.rbファイルのindexアクションでデータのクエリを行って、postsテーブルからレコードを取得する必要があります。取り出したレコードをインスタンス変数に代入して、取り出したオブジェクトにhomeページのビューでアクセスできるようにします。
- Rubyの変数がよくわからない方は、こちらのガイドをお読みください。
- Railsでデータベースからレコードを取り出す方法がよくわからない方は、Active Record クエリインターフェイスガイドをお読みください。
現時点のindexアクションは以下のようになります。
# controllers/pages_controller.rb
def index
  @posts = Post.limit(5)
end
homeページのテンプレートに移動します。
views/pages/index.html.erb
.main-content要素の内側に以下を追加します。
<%= render @posts %>
このコードによって、indexアクションで取り出したすべての投稿が表示されます。postオブジェクトはPostクラスに属しているので、Railsは自動的に以下の場所にある_post.html.erb パーシャルテンプレートをレンダリングしようとします。
views/posts/_post.html.erb
まだパーシャルファイルを作っていなかったので、ここでパーシャルを作成して以下のコードを追加しましょう。
<!-- views/posts/_post.html.erb -->
<div class="col-sm-3 single-post-card" id=<%= post_path(post.id) %>>
  <div class="card">
    <div class="card-block">
      <h4 class="post-text">
        <%= truncate(post.title, :length => 60) %>
      </h4>
      <div class="post-content">
        <div class="posted-by">Posted by <%= post.user.name %></div>
        <h3><%= post.title %></h3>
        <p><%= post.content %></p>
        <%= link_to "I'm interested", post_path(post.id), class: 'interested' %>
      </div>
    </div>
  </div><!-- card -->
</div><!-- col-sm-3 -->
欲しいスタイルを実現するために、ここではbootstrap cardコンポーネントを使いました。投稿のコンテンツとパスを要素の中に配置し、すべての投稿を表示するリンクも追加しました。
訳注: 本チュートリアルではビューのパーシャルが多用されていますが、パーシャルは使いすぎるとレンダリングが遅くなることがあるのでご注意ください。
この時点では、投稿へのルーティングがまだ定義されていません。ルーティングが必要なのでここで宣言しましょう。routes.rbファイルを開き、以下のコードを追加します(Gist)。
# config/routes.rb
resources :posts do
  collection do
    get 'hobby'
    get 'study'
    get 'team'
  end
end
ここではresourcesメソッドを用いて、index/show/new/edit/create/update/destroyアクションへのルーティングを一括で宣言しています。また、カスタムのcollectionルーティングを使ってさまざまなPostインスタンスを持つページへのルーティングも宣言しています。これらのページについては別のブランチで宣言を行うので、後ほど作成します。
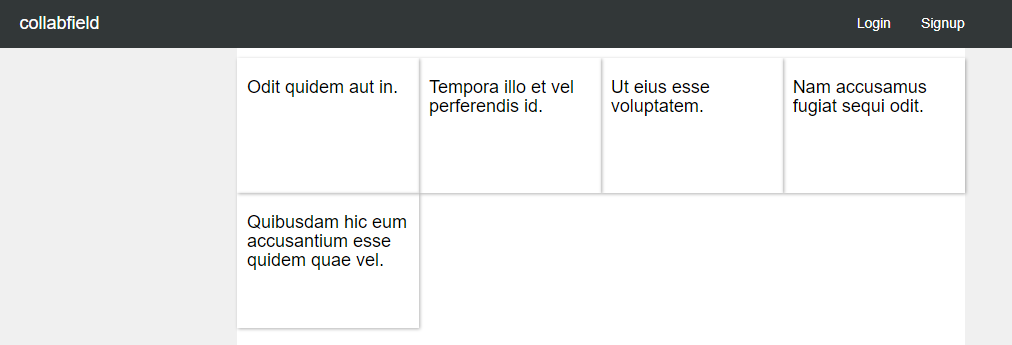
サーバーを再起動してhttp://localhost:3000をブラウザで開くと、投稿が画面に表示されるはずです。このときのアプリは以下のように表示されます。

変更をcommitします。
git add -A
git commit -m "Display posts on the home page

- Generate Posts controller and create an index action.
  Inside the index action retrieve Post records
- Declare routes for posts
- Create a _post.html.erb partial inside posts directory
- Render posts inside the home page's main content"
投稿のスタイルを整えるため、partialsディレクトリにscssファイルを1つ作成します。
assets/stylesheets/partials/posts.scss
このファイルに以下のCSSを追加します(Gist)。
// assets/stylesheets/partials/posts.scss
.single-post-card {
  min-height: 135px;
  max-height: 135px;
  box-shadow: 1px 1px 4px rgba(0,0,0, 0.3);
  color: black;
  padding: 10px;
  text-align: left;
  transition: border 0.1s, background 0.5s;
  .post-text {
    overflow: hidden;
  }
  a, a:active, a:hover {
    color: black;
  }
  &:hover {
    cursor: pointer;
    background: white;
    box-shadow: none;
    border-radius: 1%;
  }
}

.post-content {
  display: none;
}
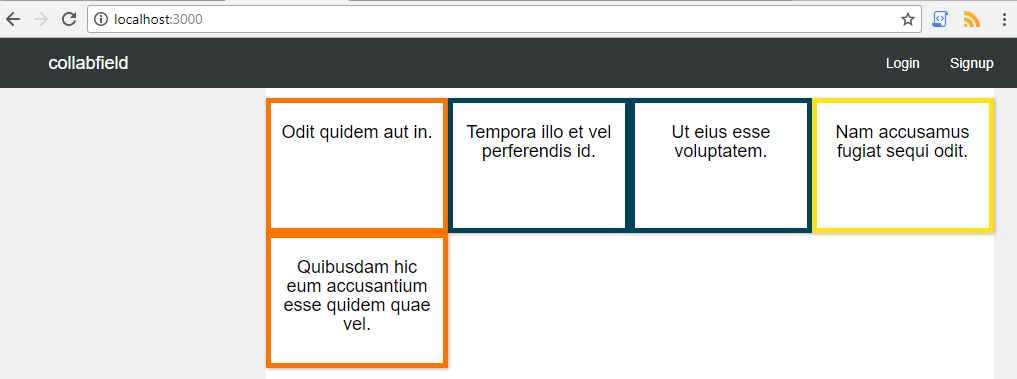
homeページの表示は次のように変わるはずです。
変更をcommitします。
git add -A
git commit -m "Create a posts.scss file and add CSS to it"
JavaScriptでスタイルを整える
現在のサイトの画面はかなりイケてない状態なので、投稿に色を追加してコントラストを付けましょう。CSSでただ色を付けるだけではつまらないので、JavaScriptを使って、ユーザーがWebサイトを更新するたびに色が変わるようにしてみます。たぶんしょうもないアイデアではありますが、まあ楽しいんじゃないでしょうかc(o_u)?
assetsの下のjavascriptsにpostsというディレクトリを作成し、その中にstyle.jsというファイルを作成します。お好みによっては、javascriptディレクトリ内にデフォルトで生成されている.coffeeファイルを削除しても構いません(本チュートリアルではCoffeeScriptを使いません)。
assets/javascripts/posts/style.js
style.jsファイルに以下のコードを追加します(Gist)。
// assets/javascripts/posts/style.js
$(document).on('turbolinks:load', function() {
    if ($(".single-post-card").length) {
        // 背景色を1つに設定
        if (mode == 1) {
            $(".single-post-card").each(function() {
                $(this).addClass("solid-color-mode");
                $(this).css('background-color', randomColor());
            });
        }
        // ボーダーの色を設定
        else {
            $(".single-post-card").each(function() {
                $(this).addClass("border-color-mode");
                $(this).css('border', '5px solid ' + randomColor());
            });
        }
    }


    $('#feed').on( 'mouseenter', '.single-post-list', function() {
        $(this).css('border-color', randomColor());
    });

    $('#feed').on( 'mouseleave', '.single-post-list', function() {
        $(this).css('border-color', 'rgba(0, 0, 0, 0.05)');
    });

});

var colorSet = randomColorSet();
var mode = Math.floor(Math.random() * 2);

// カラースキームをランダムに返す
function randomColorSet() {
    var colorSet1 = ['#45CCFF', '#49E83E', '#FFD432', '#E84B30', '#B243FF'];
    var colorSet2 = ['#FF6138', '#FFFF9D', '#BEEB9F', '#79BD8F', '#79BD8F'];
    var colorSet3 = ['#FCFFF5', '#D1DBBD', '#91AA9D', '#3E606F', '#193441'];
    var colorSet4 = ['#004358', '#1F8A70', '#BEDB39', '#FFE11A', '#FD7400'];
    var colorSet5 = ['#105B63', '#FFFAD5', '#FFD34E', '#DB9E36', '#BD4932'];
    var colorSet6 = ['#04BFBF', '#CAFCD8', '#F7E967', '#A9CF54', '#588F27'];
    var colorSet7 = ['#405952', '#9C9B7A', '#FFD393', '#FF974F', '#F54F29'];
    var randomSet = [colorSet1, colorSet2, colorSet3, colorSet4, colorSet5, colorSet6, colorSet7];
    return randomSet[Math.floor(Math.random() * randomSet.length )];
}

// カラーのarrayからランダムに色を1つ返す
function randomColor() {
    var color = colorSet[Math.floor(Math.random() * colorSet.length)];
    return color;
}
このコードでは、ブラウザ画面を再読込したときに投稿に属性を追加して2種類のスタイルモードのいずれかをランダムに設定します。スタイルの1つは色付きボーダーのみの投稿、もう1つは単色の投稿です。ページが変更されたりブラウザが更新されたりするたびに、投稿の色をランダムに変更します。定義済みのカラースキームはrandomColorSet()関数の中にあります。
mouseenterイベントハンドラとmouseleaveイベントハンドラは、今後特定のページの投稿で必要になります。そちらの投稿では、homeページの投稿と異なるスタイルにする予定です。投稿をマウスオーバーすると、下のボーダー線の色がわずかに変わります。後でやってみればわかります。
変更をcommitします。
git add -A
git commit -m "Create a style.js file and add js to create posts' style"
もう少しCSSを足してスタイルを補いましょう。posts.scssファイルを開きます。
assets/stylesheets/partials/posts.scss
以下のCSSを追加します(Gist)。
// assets/stylesheets/partials/posts.scss
...
.solid-color-mode, .border-color-mode {
  .post-text {
    text-align: center;
  }
}

.solid-color-mode {
  .post-text {
    padding: 10px;
    background-color: white;
    border-radius: 25px;
  }
}

.border-color-mode {
  background-color: white;
}
mobile.scssに以下のコードも追加して、小画面でテキストが大きくなりすぎる問題を修正します(Gist)。
// assets/stylesheets/responsive/mobile.scss
@media screen and (max-width: 1000px) {
  .solid-color-mode, .border-color-mode {
    .post-text {
      font-size: 16px;
    }
  }
}
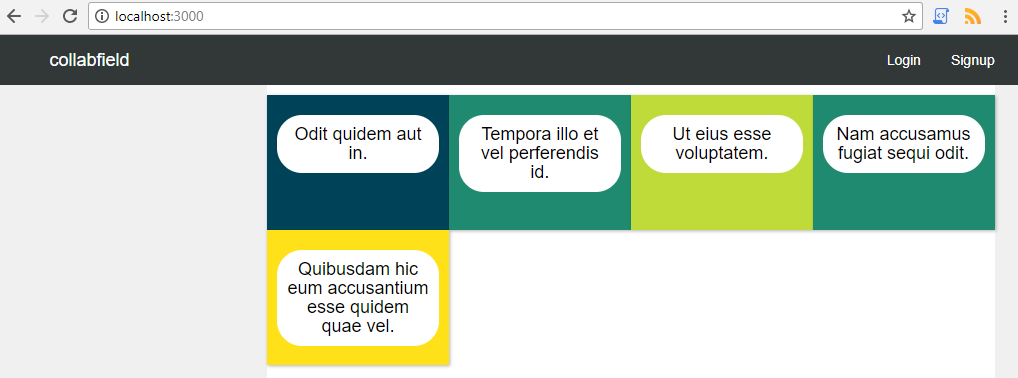
これでhomeページは以下のように表示されるはずです。

変更をcommitします。
git add -A
git commit -m "Add CSS to posts on the home page
- add CSS to the posts.scss file
- add CSS to the mobile.scss to fix too large text issues on smaller screens"
モーダルウィンドウ
投稿の1つをクリックすると、他のページに遷移せずに投稿の内容をすべて表示するようにしたいと思います。この機能を実現するために、Bootstrapのmodal componentを使うことにします。
postsディレクトリに_modal.html.erbパーシャルファイルを作成します。
views/posts/_modal.html.erb
以下のコードを追加します(Gist)。
<!-- views/posts/_modal.html.erb -->
<!-- Modal -->
<div  class="modal myModal"
      tabindex="-1"
      role="dialog"
      aria-labelledby="myModalLabel">
  <div class="modal-dialog modal-lg" role="document">
    <div class="modal-content">
      <div class="modal-header">
        <span class="posted-by"></span>
        <button type="button"
                class="close"
                data-dismiss="modal"
                aria-label="Close">
          <span aria-hidden="true">×</span>
        </button>
      </div>
        <div class="modal-body">
          <div class="loaded-data">
            <h3></h3>
            <p></p>
            <div class="interested"><a href="">I'm interested</a></div>
          </div><!-- loaded-data -->
        </div><!-- modal-body -->
    </div>
  </div>
</div>
ここではこの特定のタスクを達成するため、Bootstrapのコンポーネントをほんの少しだけ変更しています。
homeページテンプレートの冒頭でこのパーシャルを表示します(Gist)。
<!-- views/pages/index.html.erb -->
<%= render 'posts/modal' %>
モーダルウィンドウを動かすためにJavaScriptコードを少々追加しなければなりません。postsディレクトリにmodal.jsというファイルを作成します。
assets/javascripts/posts/modal.js
このファイルに以下のコードを追加します(Gist)。
// assets/javascripts/posts/modal.js
$(document).on('turbolinks:load', function() {
  // when a post is clicked, show its full content in a modal window
  $("body").on( "click", ".single-post-card, .single-post-list", function() {
    var posted_by = $(this).find('.post-content .posted-by').html();
    var post_heading = $(this).find('.post-content h3').html();
    var post_content = $(this).find('.post-content p').html();
    var interested = $(this).find('.post-content .interested').attr('href');
    $('.modal-header .posted-by').text(posted_by);
    $('.loaded-data h3').text(post_heading);
    $('.loaded-data p').text(post_content);
    $('.loaded-data .interested a').attr('href', interested);
    $('.myModal').modal('show');
  });
});
選択した投稿のデータをいくつかの変数に保存してモーダルウィンドウの要素にこのデータを表示する簡単なコードです。コードの最後の部分でモーダルウィンドウの表示がオンになります。
モーダルウィンドウの外観を強調するためにCSSを少し追加しましょう。その前に、stylesheetsディレクトリで簡単な管理作業を行います。
partialsディレクトリの下にpostsというディレクトリを作成します。
assets/stylesheets/partials/posts
このpostsディレクトリの下にhome_page.scssファイルを作成し、posts.scssの内容をカットしてこのファイルに貼り付け、posts.scssを削除します。CSSコードをよりよく管理するために、1つの大規模なファイルにすべてをぶち込むのではなく、異なる目的ごとに小規模なCSSファイルを使って見通しをよくします。
postsディレクトリの下にmodal.scssファイルを作成し、以下のCSSを追加します(Gist)。
// assets/stylesheets/partials/posts/modal.scss
.modal-content {
  h3 {
    text-align: center;
  }
  p {
    margin: 50px 0;
  }
  .posted-by {
    color: rgba(0,0,0,0.5);
  }
}

.modal-content {
  .loaded-data {
    h3, p {
      overflow: hidden;
    }
    padding: 0 10px;
    .posted-by {
      margin: 0;
    }
  }
}

.interested {
  text-align: center;
  a {
    background-color: $navbarColor;
    padding: 10px;
    color: white;
    border-radius: 10px;
    &:hover {
      background-color: black;
      color: white;
    }
  }
}
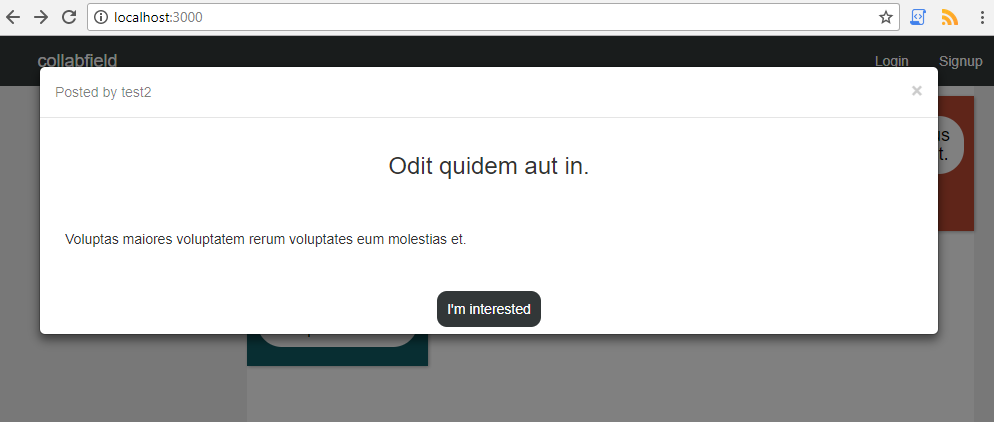
これで、投稿をクリックすると以下のように表示されるはずです。
変更をcommitします。
git add -A
git commit -m "Add a popup window to show a full post's content
- Add bootstrap's modal component to show full post's content
- Render the modal inside the home page's template
- Add js to fill the modal with post's content and show it
- Add CSS to style the modal"
main_feedブランチをmasterにmergeします。
git checkout master
git merge main_feed
main_feedを削除します。
git branch -D main_feed