- Ruby / Rails以外の開発一般
- Ruby / Rails関連
Rails: Hotwire Nativeで作るネイティブモバイルアプリ: Android編(4)ブリッジコンポーネント(翻訳)
Rails: Hotwire Nativeで作るネイティブモバイルアプリ: Android編(4)ブリッジコンポーネント(翻訳)
前回の記事では、ネイティブ画面に移動して Android ViewsまたはJetpack Composeでレンダリングする方法について解説しました。
しかしネイティブ画面にはトレードオフがあります。同じネイティブ画面を「iOS用」「Android」用にそれぞれ作成すると、複雑になってコストがかさみます。
しかし、モバイルネイティブなプラットフォームの機能を活用したい場合もあります。
本日は、Web画面でネイティブの機能を活用する方法を紹介します。
🔗 ブリッジコンポーネント
ブリッジコンポーネント(bridge component)はStimulusコントローラの拡張で、ネイティブアプリにメッセージを送信できるようにします。
ブリッジコンポーネントは以下の手順で実装します。
- ネイティブアプリにメッセージを送受信できるJavaScriptコンポーネントを作成する
- Webアプリからメッセージを受信して返信できるネイティブブリッジコンポーネントを作成する
- AndroidアプリのHotwireコンポーネントレジスタにネイティブコンポーネントを追加する
ブリッジで重要なメソッドはsendメソッドです。このメソッドは、「イベント」「データ」「コールバック」を受け取り、ネイティブコンポーネントがメッセージに返信したときに実行します。
🔗 最初のコンポーネントを作成する
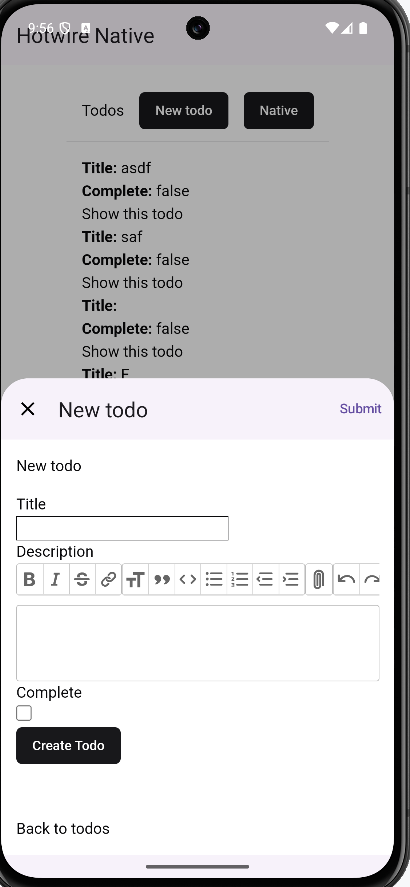
フォームのモーダルにネイティブのSubmit(送信)ボタンを追加するフォームコンポーネントを構築しましょう。
最初にRailsアプリ側で作業します。
以下のコマンドを実行してブリッジライブラリをインストールします。
./bin/importmap pin @hotwired/stimulus @hotwired/hotwire-native-bridge
次に、app/javascript/controllers/bridge/form_controller.jsファイルを作成して以下のブリッジコンポーネントを作成します。
import { BridgeComponent, BridgeElement } from "@hotwired/hotwire-native-bridge"

export default class extends BridgeComponent {
  static component = "form"
  static targets = [ "submit" ]

  submitTargetConnected(target) {
    const submitButton = new BridgeElement(target)
    const submitTitle = submitButton.title

    this.send("connect", { submitTitle }, () => {
      target.click()
    })
  }
}
最後に、todos/_form.html.erbファイルにあるフォームにStimulus用のマークアップを追加します。
-<%= form_with(model: todo) do |form| %>
+<%= form_with(model: todo, data: {controller: 'bridge--form'}) do |form| %>
  <% if todo.errors.any? %>
    <div style="color: red">
      <h2><%= pluralize(todo.errors.count, "error") %> prohibited this todo from being saved:</h2>

      <ul>
        <% todo.errors.each do |error| %>
          <li><%= error.full_message %></li>
        <% end %>
      </ul>
    </div>
  <% end %>

  <div>
    <%= form.label :title, style: "display: block" %>
    <%= form.text_field :title %>
  </div>

  <div>
    <%= form.label :complete, style: "display: block" %>
    <%= form.checkbox :complete %>
  </div>

  <div>
-   <%= form.submit %>
+   <%= form.submit data: {bridge__form_target: "submit", bridge_title: 'Save'} %>
  </div>
<% end %>
Rails側の作業はこれですべておしまいです。
🔗 Androidのコンポーネントを構築する
コンポーネントでは以下を行います。これはiOSの場合と似ています。
- メッセージを受信する
- 受信したメッセージに応答する
- WebViewへの返信にAndroidアプリのメッセージを含める
新しいブリッジコンポーネントを構築するときは、可動部分が多数ある可能性があるため、段階的に構築するのが普通です。
最初はコンポーネントを接続します。
次に、機能の構築を段階的に開始します。ここでは試行錯誤が何度も繰り返されます。
bridgeという名前で新しいパッケージを作成し、そこにFormComponentというファイルを以下の内容で作成します。
// app/src/main/java/bridge/FormComponent.kt
package bridge

import android.util.Log
import dev.hotwire.core.bridge.BridgeComponent
import dev.hotwire.core.bridge.BridgeDelegate
import dev.hotwire.core.bridge.Message
import dev.hotwire.navigation.destinations.HotwireDestination

class FormComponent(
  name: String,
  private val formDelegate: BridgeDelegate<HotwireDestination>
) : BridgeComponent<HotwireDestination>(name, formDelegate) {

  override fun onReceive(message: Message) {
    when (message.event) {
      "connect" -> handleConnectEvent(message)
      else -> Log.w("FormComponent", "Unknown event for message: $message")
    }
  }

  private fun handleConnectEvent(message: Message) {

    Log.w("FormComponent", "connected")
  }
}
次は、HotwireApplicationファイルにブリッジコンポーネントを登録します。
// 以下のimportも追加が必要
import dev.hotwire.navigation.config.registerBridgeComponents
import dev.hotwire.core.bridge.BridgeComponentFactory
import bridge.FormComponent

Hotwire.registerBridgeComponents(
 BridgeComponentFactory("form", ::FormComponent)
)
アプリをリビルトし、エミュレーターでフォームページに移動してモーダルを表示します。
Android Studioのログ(左ツールバーのLogcat)を確認すると、以下のようにメッセージが出力されているはずです。
ここまで構築したフォームコンポーネントは易しい部分です。
次に、Androidのエコシステムにおけるいくつかの異なる側面を理解する必要があります。
まず、WebBottomSheetFragmentを以下のように編集して、Hotwire Native備え付けの下部シートを使う代わりに、独自のシートを使うようにする必要があります。
// app/src/main/java/com/example/hotwireexample/WebBottomSheetFragment.kt
package com.example.hotwireexample

import dev.hotwire.navigation.destinations.HotwireDestinationDeepLink
import dev.hotwire.navigation.fragments.HotwireWebBottomSheetFragment
import android.view.LayoutInflater
import android.view.ViewGroup
import android.os.Bundle

@HotwireDestinationDeepLink(uri = "hotwire://fragment/web/modal/sheet")
class WebBottomSheetFragment : HotwireWebBottomSheetFragment() {
  override fun onCreateView(inflater: LayoutInflater, container: ViewGroup?, savedInstanceState: Bundle?): View? {
    return inflater.inflate(R.layout.fragment_web_bottom_sheet, container, false)
  }
}
次に、res/layout/ディレクトリの下で、fragment_web_bottom_sheetを以下の内容で作成します。
<?xml version="1.0" encoding="utf-8"?>
<LinearLayout
    xmlns:android="http://schemas.android.com/apk/res/android"
    android:layout_width="match_parent"
    android:layout_height="match_parent"
    android:orientation="vertical">

    <com.google.android.material.appbar.AppBarLayout
        android:id="@+id/app_bar"
        android:layout_width="match_parent"
        android:layout_height="wrap_content"
        android:background="@color/transparent"
        android:stateListAnimator="@null">

        <com.google.android.material.appbar.MaterialToolbar
            android:id="@+id/toolbar"
            android:layout_width="match_parent"
            android:layout_height="wrap_content"
            android:background="@color/transparent">

        <androidx.compose.ui.platform.ComposeView
            android:id="@+id/compose_view"
            android:layout_width="wrap_content"
            android:layout_height="wrap_content" />
        </com.google.android.material.appbar.MaterialToolbar>

    </com.google.android.material.appbar.AppBarLayout>

    <include
        layout="@layout/hotwire_view_bottom_sheet"
        android:layout_width="match_parent"
        android:layout_height="match_parent"
        android:background="?android:colorBackground" />

</LinearLayout>
再びFormComponentに戻りましょう。
Webから受信したメッセージを解析可能にする必要があります。
@Serializable
class FormExampleComponent(
    name: String,
    private val formDelegate: BridgeDelegate<HotwireDestination>
) : BridgeComponent<HotwireDestination>(name, formDelegate) {

    ...

    private fun handleConnectEvent(message: Message) {
        val data = message.data<MessageData>() ?: return
        Log.w("FormComponent", "connected")
    }
}

@Serializable
data class MessageData(
    @SerialName("submitTitle") val title: String
)
ここでSerializableエラーが発生するでしょう。これは、正しいライブラリを構成する必要があることを意味します。
libs.versions.tomlに以下を追加します。
[versions]
...
serialization = "1.5.0"

[libraries]
...
kotlin-serialization-json = { module = "org.jetbrains.kotlinx:kotlinx-serialization-json", version.ref = "serialization"}

[plugins]
...
jetbrains-serialization = {id = "org.jetbrains.kotlin.plugin.serialization", version.ref = "kotlin"}
次に、アプリのbuild.gradle.ktsファイルに以下を追加します。
plugins {
   ...
    alias(libs.plugins.jetbrains.serialization)

}

android {
  ....
}

dependencies {
.   ...
    implementation(libs.kotlin.serialization.json)

}
"Sync Now"が表示されたらクリックしてgradleファイルを同期すること。
これでBridgeComponentの構築に必要なものがすべて揃ったので、いよいよFormComponentの仕上げにかかります。
🔗 FormComponentを仕上げる
骨組みができたので、最初は操作するAndroid Viewについてクラスに伝えましょう。
class FormComponent(
    name: String,
    private val formDelegate: BridgeDelegate<HotwireDestination>
) : BridgeComponent<HotwireDestination>(name, formDelegate) {

+   private val fragment: Fragment
+       get() = formDelegate.destination.fragment
+
+   private val toolbar: MaterialToolbar?
+       get() = fragment.view?.findViewById(R.id.toolbar)
+   private var submitMenuItem: android.view.MenuItem? = null
  ....
このhandleConnectEvent関数では、以下のようにデータを解析し、そのデータを使ってツールバーの構築を開始しましょう。
  private fun handleConnectEvent(message: Message) {
        val data = message.data<MessageData>() ?: return
        Log.w("FormComponent", "connected")
        showToolbarButton(data)
    }

  private fun showToolbarButton(data: MessageData) {}
ここまで来れば、構築が必要なパーツはあと2つだけです。
private fun showToolbarButton(data: MessageData) {
    val menu = toolbar?.menu ?: return

    // Find the ComposeView by ID in the fragment's view hierarchy
    val composeView: ComposeView = fragment.view?.findViewById(R.id.compose_view) ?: return

    // Set the Compose content in the ComposeView
    composeView.setContent {
        SubmitButton(
            title = data.title,
            onSubmitClick = {
                Log.d("FormComponent", "FormComponent button pressed")
                replyTo("connect")
            }
        )
    }

    // Add the ComposeView as the actionView for the menu item
    submitMenuItem = menu.add(Menu.NONE, 20, 999, data.title).apply {
        actionView = composeView
        setShowAsAction(android.view.MenuItem.SHOW_AS_ACTION_ALWAYS)
    }

    Log.d("FormComponent", "FormComponent showToolbarButton with ComposeView from layout")
}

@Composable
fun SubmitButton(title: String, onSubmitClick: () -> Unit) {
    TextButton(onClick = onSubmitClick) {
        Text(text = title)
    }
}
なお、20と999という数字を選んだ特別な理由はありません。
完成したコンポーネントは以下のようになります。
// app/src/main/java/bridge/FormComponent.kt
package bridge

import android.util.Log
import dev.hotwire.core.bridge.BridgeComponent
import dev.hotwire.core.bridge.BridgeDelegate
import dev.hotwire.core.bridge.Message
import dev.hotwire.navigation.destinations.HotwireDestination
import com.google.android.material.appbar.MaterialToolbar
import androidx.fragment.app.Fragment
import com.example.hotwireexample.R
import android.view.Menu

class FormComponent(
  name: String,
  private val formDelegate: BridgeDelegate<HotwireDestination>
) : BridgeComponent<HotwireDestination>(name, formDelegate) {

  private val fragment: Fragment
    get() = formDelegate.destination.fragment

  private val toolbar: MaterialToolbar?
    get() = fragment.view?.findViewById(R.id.toolbar)
  private var submitMenuItem: android.view.MenuItem? = null

  override fun onReceive(message: Message) {
    when (message.event) {
      "connect" -> handleConnectEvent(message)
      else -> Log.w("FormComponent", "Unknown event for message: $message")
    }
  }

  private fun handleConnectEvent(message: Message) {
    val data = message.data<MessageData>() ?: return
    Log.w("FormComponent", "connected")
    showToolbarButton(data)
  }

  private fun showToolbarButton(data: MessageData) {
    val menu = toolbar?.menu ?: return

    // Find the ComposeView by ID in the fragment's view hierarchy
    val composeView: ComposeView = fragment.view?.findViewById(R.id.compose_view) ?: return

    // Set the Compose content in the ComposeView
    composeView.setContent {
      SubmitButton(
        title = data.title,
        onSubmitClick = {
          Log.d("FormComponent", "FormComponent button pressed")
          replyTo("connect")
        }
      )
    }

    // Add the ComposeView as the actionView for the menu item
    submitMenuItem = menu.add(Menu.NONE, 20, 999, data.title).apply {
      actionView = composeView
      setShowAsAction(android.view.MenuItem.SHOW_AS_ACTION_ALWAYS)
    }

    Log.d("FormComponent", "FormComponent showToolbarButton with ComposeView from layout")
  }

  @Composable
  fun SubmitButton(title: String, onSubmitClick: () -> Unit) {
    TextButton(onClick = onSubmitClick) {
      Text(text = title)
    }
  }
}
以上でおしまいです。
次回の記事では、iOSシリーズで行ったのと同様に、すべてを組み合わせてカスタムTrixコンポーネントを構築します。
ではそれまでHappy hacking!
関連記事
Rails: Hotwire Nativeで作るネイティブモバイルアプリ: Android編(3)ネイティブ画面(翻訳)


概要
元サイトの許諾を得て翻訳・公開いたします。
日本語タイトルは内容に即したものにしました。
従来Turbo NativeとStradaと呼ばれていたものは、現在はHotwire Nativeに統合されました。
参考: Hotwire Native: Hotwire Native is a web-first framework for building native mobile apps.